| |
|
|
| |
This page is still under construction.
 To Do It's time to finalize
and sort the content
on this page, but ...! ;-)
To Do It's time to finalize
and sort the content
on this page, but ...! ;-) |
| |
|
|
| |
|
|
| |
|
|
| |
|
|
| |
|
|
| |
"Die Einen kochen und kreieren leckere Gerichte; hier findet
man einige Zutaten zur Realisierung elektronischer Schaltungen."
mkn, 2013, ;-) |
| |
|
|
| |
|
|
|
|
|
| |
|
|
| |
|
[09.02.2020, mkn] |
| |
- MCU, es hilft nichts, man(n) mu▀
ran
- der zweite Start in 2020
|
-
ARDUINO war schon einmal aktuell |
| |
|
|
| |
ARDUINO |
|
| |
-
Arduino Forum
|
|
| |
|
|
| |
Arduino
Desktop IDE |
|
| |
|
 |
| |
-
Arduino IDE - Programmieren f³r Einsteiger - Teil 1 by Andreas
Wolter, Mõr 13, 2020
|
|
| |
-
Arduino IDE - Programmieren f³r Einsteiger - Teil 2 by Andreas
Wolter, Mõr 31, 2020
|
|
| |
|
|
| |
- Boot-Loader |
|
| |
|
|
| |
- Einschalten der
Zeilen-Nummerierung
- > Anzeigen der Zeilennummern anklicken |
 |
| |
|
|
| |
|
|
| |
-
https://www.az-delivery.de/search?type=article%2Cpage%2Cproduct&q=arduino
|
|
| |
-
https://www.pollin.de/search?query=arduino&channel=pollin-de
|
|
| |
|
|
| |
|
|
| |
-
ARDUINO UNO R3 ATmega328P ATmega16U2 Development Board with USB Cable
Pro |
Bild, Anschl³sse |
| |
|
|
| |
|
|
| |
DISPLAYS
|
|
| |
|
|
| |
-
Im
Display-Library-Labyrinth Make Magazin | Heise Magazine |
|
| |
|
|
| |
LCD
|
|
| |
|
|
| |
LCD DISPLAY 4*20
|
|
| |
|
|
| |
-
HD44780 2004 LCD Display Bundle 4x20 Zeichen mit I2C Schnittstelle f³r
Arduino
- 4 Zeilen zu je 20 Zeichen
- Blaues
Backlight / Hintergrundbeleuchtung
- Abmessungen: 98x60x12mm
- Versorgungsspannung 5V |
|
| |
|
|
| |
-
LCD 20x4 blau / wei▀ und IIC I2C Interface f³r 2004 Displays
-
Zeichensatz
|
|
| |
|
|
| |
LCD DISPLAY 2*16
|
|
| |
|
|
| |
- 2 Zeilen zu je16 Zeichen |
|
| |
|
|
| |
|
|
| |
-
Mein I2C-Display-Adapter geht nicht ...
- Helligkeit
einregeln
- Adresse: 0x27, abhõngig vom Display |
|
| |
|
|
| |
-
Anschluss von LCD-Displays ³ber den IIC-Bus |
-
IIC / I2C Interface f³r 1602 / 2004 Displays BerryBase
|
| |
|
|
|
-
Tipp zum Artikel "Umlaute auf LCD" Albert VuNov 08, 2018 |
|
| |
|
|
| |
|
|
| |
128 x 64 Pixel LCD Display 12864
|
|
| |
|
12864
12864B V2.0 |
| |
-
Datenblatt |
|
| |
- Neu im Shop:
12864B 128x64 LCD Matrix Display |
|
| |
-
128 x 64 Pixel LCD Display 12864 Display Modul |
U8glib library copyright notice:
Universal 8bit
Graphics Library,
http://code.google.com/p/u8glib/
Copyright (c) 2012,
olikraus@gmail.com All rights reserved. |
| |
-
https://www.buydisplay.com/lcd-display-serial-graphic-display-128x64-st7920-white-on-blue
|
|
| |
-
Graphic 128x64 LCD Display Module 12864 White on Blue 5V Header Strip
-
Datasheet und mehr
https://eckstein-shop.de
|
|
| |
-
I2C
Graphic 128x64 LCD Adapter - RobotDyn
- 20 pin
|
|
| |
- Grafik
LCD YB12864ZB (128x64 Pixel)
|
|
| |
|
|
| |
-
https://github.com/olikraus/u8glib
-
https://github.com/olikraus/u8glib/wiki/fontsize
-
https://github.com/olikraus/u8g2/wiki
-
https://github.com/olikraus/u8g2/wiki/setup_tutorial
-
https://github.com/olikraus/u8g2/wiki/fntgrp
|
12864B AZ-Delivery Nano V3
GND GND
VCC 5V
RS D10
R/W D11
E D13
PSB GND
BLA 5V
BLK GND |
| |
|
|
| |
|
|
| |
OLED
|
|
| |
|
|
| |
|
|
| |
-
Github Dateien zum direkten Download Arduino |
|
| |
|
|
| |
TFT
|
|
| |
|
|
| |
|
|
| |
|
|
| |
|
|
| |
-
2.4" TFT LCD Display Touch Panel SPI Serial 240x320 ILI9341 f³r Arduino
UNO ZH6 | eBay
|
|
| |
|
|
| |
AZ-Touch Wandgehõuseset mit Touchscreen f³r ESP8266 und ESP 32
AZ-Delivery |
|
| |
-
ArduiTouch 1 - Funktionsweise und Verwendung des Touch-Screen
AZ-Delivery
-
ESP-32 Dev Kit C bei az-delivery.de
|
|
| |
|
|
| |
NANO V3 auf Buchsenleiste
-
MPE 115-1-015 Prõz.-Buchsenleisten 2,54 mm, 1X15, gerade
-
Datenblatt
- mating pin 0,64 Quadrat
|
|
| |
-
ARDUINO UNO
|
|
| |
-
AZ-Delivery
UnoR3 |
|
| |
|
|
| |
-
LCD1602 Display Keypad Shield HD44780 1602 Modul mit 2x16 Zeichen f³r
Arduino
f³r UNOR3
-
Schematic |
|
| |
-
LCD KeyPad Shield Albert Vu Jun 18, 2018
- Programmierung einer Stop-Uhr |
|
| |
|
|
| |
-
Universal Asynchronous Receiver Transmitter ¢ Wikipedia |
|
| |
-
Arduino-Steckplatinen: Aufbau ohne L÷tkolben - PC-WELT |
|
| |
-
Steckboard in der Praxis ¢ Elektronik-Tipps |
|
| |
|
|
| |
|
|
| |
|
|
| |
|
|
| |
|
|
| |
|
|
| |
Bezugsquellen
|
|
| |
- Preise,
Versandkosten, Service, Erfahrungen |
|
| |
- Wer alles in China
ein- und wiederverkauft |
|
| |
|
|
| |
-
AZ-Delivery |
- Preisanstieg im April 2020 |
| |
- Berrybase |
|
| |
-
cheaptronic24 |
|
| |
-
MAKERSHOP.de
-Support |
Nano ATmega328 V3.1 Board April 2020, ok
- Arduino Nano V3 Kompatibel ATmega328 Board |
| |
-
Christian's Technikshop |
|
| |
|
|
| |
|
|
| |
Interfacing
|
|
| |
|
|
| |
-
Interfacing GPIO 3.3V to 74HC04 5V Electrical
Engineering Stack Exchange |
|
|
-
S/PDIF: TTL to Coax Converter - Electrical Engineering Stack Exchange |
|
| |
|
|
| |
-
Stiftleiste Pin Header
mõnnlich 40 Pin 2.54mm |
|
| |
|
|
| |
-
Educaboard
- The easy Education Board for the World of Arduino
- Arduino Nano
- uBlox NEO-6M GPS |
|
| |
|
|
| |
|
|
| |
|
|
| |
|
|
| |
|
|
| |
-
35M-4.4GHz PLL RF Signal Source Frequency Synthesizer ADF4350
Development Board |
Bestellt: 09.03.2020
Erhalten: 12.03.2020 |
| |
-Power Supply: DC002 Interface
DC4-9V(typical 5V)
- Output Frequency Range: ADF4351: 35M-4.4G
-
Size: 49 x 37 x 12mm |
|
| |
"Features: This ADF4351 signal
source development board has well designed circuit board layout. It can
be controlled by the upper computer official software.
All control
pins are leaded out for convenient operation.
Default + -50ppm 25M
active crystal oscillator.
Circuit diagram in PDF format and STM32
test program are provided.
Three-wire SPI lead to control pin and
state locking pin, allowing all functions including point frequency
sweep and frequency hopping, stepping to 1K, low frequency step can be
0.1K, according to crystal frequency.
Specifications: Output
Frequency Range:
ADF4351: 35M-4.4G
Power Supply: DC002 Interface
DC4-9V(typical 5V)
Output Signal: 2.2-4.4G fundamental wave (sine
wave),
35M-2.2G fundamental division (square
wave)
Signal Output Connector: SMA female
Size: 49 x 37 x 12mm /
1.93 x 1.45 x 0.47"
File Download:
http://pan.baidu.com/s/1o8gBCJS (password: gnxy)
Package
Includes: 1 x Signal Source Development Board
Note: This board
requires professional knowledge and ability, please make sure you know
how to use it." |
-
EVAL-ADF4351 ADF4351 Evaluation Board
|
| |
|
|
| |
- Steuerung miitels ARDUINO |
|
| |
ADF4351 driven by an Arduino RF Generator 34.5 to 4400 MHz by Alain Fort F1CJN,
March 7, 2016 |
| |
|
|
| |
|
|
| |
-
Teil 2: Frequenzgenerator
f³r nahezu beliebige Frequenzen im Bereich
|
|
| |
---------------------------------- |
|
| |
-
ADF435x PIC |
|
|
-
Warning: A recent batch of Chinese boards have a 5V regulator fitted
instead of the required 3v3 regulator. Please check your board before
you apply power. Details here:
https://forum.batc.org.uk/viewtopic.php?f=103&t=5375
|
-
ADF4351 internal and external voltages. |
| |
|
|
| |
|
|
| |
|
|
| |
|
|
| |
|
|
| |
-https://www.ftdichip.com/Support/Documents/InstallGuides.htm |
|
| |
-
AN_396 FTDI Drivers Installation Guide for Windows 10
|
 |
| |
|
|
| |
|
|
| |
Programmierung - SKETCH
|
|
| |
|
LbD, KISS, RFM |
| |
IDE (Integreated
Development Enviroment) |
|
| |
eine Entwicklungsumgebung,
Plattform zur Programmentwicklung, Kompilierung, Debugging, Monitoring
und Upload des Programms auf den Arduino |
|
- die Hardware ben÷tigt Arbeit, Input, der
Ruf, die Abfrage was soll ich tun, alle Kanõle werden abgefragt |
| |
IDE auf
arduino.cc frei verf³gbar
-
Download the
Arduino IDE
-
Getting Started with
Arduino products
-
Getting Started
with the Arduino Nano
-
Use your
Arduino Nano on the Arduino Desktop IDE
|
|
| |
Installation der Plattform,
IDE.zip -> mobile Anwendung |
|
| |
|
|
| |
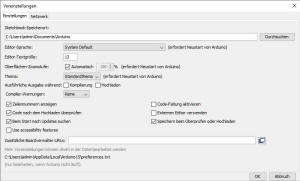
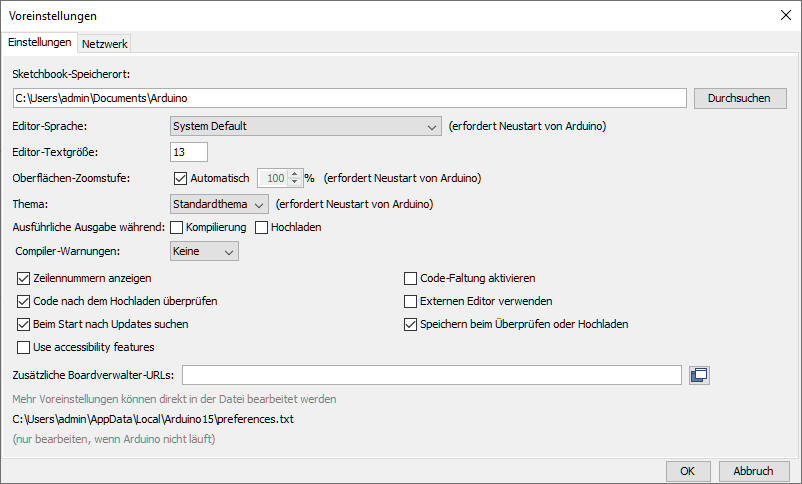
IDE Oberflõche |
|
| |
|
|
| |
Voreinstellung der Software,
Anpassungen |
|
| |
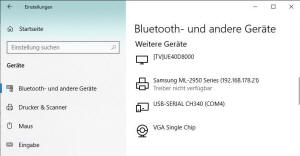
Plattform Auswahl
Arduino, ESP
NANO
Bootloader
COM
|
|
| |
Unteres Teilfenster nach Oben
vergr÷ssern, Ausgabe Fehlermeldung
in Textprogramm kopieren
|
|
| |
|
|
| |
|
|
| |
|
|
| |
|
|
| |
|
|
| |
|
|
| |
SOFTWARE
|
|
| |
|
|
| |
Das Programm f³r ein
Anwendung entsteht
-
-
- |
|
| |
Programm, Programmcodes = genannt
SKETCHES
|
|
| |
Programmiersprache ist eine
C-Variante |
-
Sprach-Referenz [DE]
-
Language Reference
[DE] |
| |
Programm-Struktur |
|
| |
Deklarationen, Setup, Loop |
|
| |
- Struktur, Werte
(Variablen und Konstanten) und Funktionen |
|
| |
Das Basisprogramm ist dreiteilig
aufgebaut: Deklarationen, Setup, Loop |
Beispiel f³r Basisprogramm zum Einstieg:
blinkende LED ( Name z.B.; blink.ini )
|
| |
|
|
| |
|
void setup() {
// put your setup code here, to run once:
}
void loop() {
// put your main code here, to run repeatedly:
} |
-
void |
| |
|
|
| |
Erste Schritte in einem Sketch |
|
| |
- Versuch einfache Sketch zu
interpretieren |
|
| |
- Programm-Files enden mit
.ino |
|
| |
- z.B. Filename.ino |
|
| |
- // Kommentar,
g³ltig f³r eine Zeile |
|
| |
|
|
| |
- /*
Blockkommentar, der Block wird mit */ abgeschlossen
|
/* Kommentarblock beginnt
* Fortsetzung
*
*
*/ Kommentarblock zu Ende |
| |
- { ... },
geschweifte Klammer, in diesem Bereich gilt die jeweilige Deklaration,
Operation |
|
| |
|
|
| |
- println xxx;
Ausgabe von xxx, danach LF, Wagenr³cklauf |
|
| |
- print |
|
| |
|
|
| |
Zuweisungsoperatoren |
|
| |
- = ; der
Wert der rechten Seite wird der linken Seite zugewiesen |
|
| |
- ; , das
Semikolon schlie▀t eine Anweisungszeile, Ende der Zeil |
spõtesten beim Test kommt eine Fehlermeldung, fõlls ein
; fehlt. |
| |
|
|
| |
- ==
Vergleichsoperator, sind beide Seiten gleich? |
|
| |
|
|
| |
Zeilen vor dem void Setup |
|
| |
- const int LEDPin,
LEDPin werden Eigenschaften zugewiesen
Konstante ganzzahlig
Variable LEDPin |
|
| |
|
|
| |
farbe BLAU vordefiniert |
|
| |
|
|
| |
Blink without Delay |
|
|
- int
Integer, ganzzahlig, - ... + Wertebereich |
|
| |
- unsigned ;
vorzeichenlos, nur positive Werte |
|
| |
|
|
| |
- toggled mal Low mal High |
|
| |
|
|
| |
- =
Zuweisungsoperator |
|
| |
- ==
Vergleichsoperator |
|
| |
- != ungleich |
|
| |
|
|
| |
|
|
| |
|
|
| |
|
|
| |
|
|
| |
|
|
| |
|
|
| |
|
|
| |
|
|
| |
LIBRARIES (Bibliotheken)
|
|
| |
Was, wie, Verwendung |
|
| |
|
|
| |
|
|
| |
- im Unterordner des Projektes
speichern |
|
| |
|
|
| |
|
|
| |
|
|
| |
|
|
| |
|
|
| |
|
|
| |
|
|
| |
- Scanner Bestimmung der
Teilnehmeradressen am I2C-Bus |
|
| |
|
|
| |
|
|
| |
|
|
| |
|
|
| |
|
|
| |
-
EEPROM Library
- Speicherung einer erfassten Variablen als Festwert im Speicher
|
|
| |
|
|
| |
|
* wie FLASHE ich ein Programm in den Speicher des
Mikrocontrollers? |
| |
|
* was sind sog. BOOTLOADER? |
| |
|
|
| |
|
|
| |
- ToDo |
|
| |
- Historie des Programms |
|
| |
- innere Dokumentation des Codes,
ersp÷nliche Hilde beim Erinnern, steigert die lesbarkeit und Verstõndis
durch Dritte |
| |
- Usermanual |
|
| |
- Copyright |
|
| |
- Weitergabe von Programmen,
Hex-File, Sketch |
|
| |
- Achtung, vor dem Update der IDE
die Daten sichern!!! |
|
| |
- Interrupt |
|
| |
- Reset |
|
| |
-
KISS |
|
| |
-
LbD, Learning
by Doing |
|
| |
- RFM read the fucking manual,
Lies das verdammte Handbuch |
|
| |
|
|
| |
Anwendungen
|
|
| |
|
|
| |
Digital Volt Meter DVM
|
|
| |
-
Nano Digital Volt Meter |
|
| |
-
Arduino LCD Voltmeter with 4 Channels |
|
| |
|
|
| |
|
|
| |
Sensor: Temperatur
|
|
| |
-
DS18B20 |
|
| |
-
DS18B20 by Moritz Spranger
- Versuchsaufbau mit NANO
-
Arduino plug and go library for the Maxim (previously Dallas) DS18B20
(and similar) temperature ICs by Miles Burton
-
Dallas Temperature Control Library
|
| |
|
|
| |
-
DS 18B20 Digital Thermometer, 1-wire +/- 0,5░C, TO-92 by Reichelt
-
https://cdn-reichelt.de/documents/datenblatt/A200/DS18B20Z-DAL.pdf
|
|
| |
|
|
| |
-
https://download.mikroe.com/documents/compilers/mikroc/pic/help/onewire_library.htm
|
|
| |
-
http://guggenberger.me/tag/onewire-h/
|
|
| |
-
https://www.google.de/search?restrict=Deutsch&q=onewire.h&btnG=Google-Suche&gws_rd=ssl#spf=1587314688358
|
|
| |
|
|
|
-
https://m.heise.de/developer/artikel/Lauschen-mit-Sensoren-3217195.html
|
|
| |
|
|
| |
-
https://draeger-it.blog/arduino-lektion-48-temperatursensor-ds18b20/?cn-reloaded=1
|
|
| |
-
http://shelvin.de/temperatursensor-ds18b20-mit-dem-arduino-uno-teil-2/
|
|
| |
-
https://github.com/milesburton/Arduino-Temperature-Control-Library
|
|
| |
|
|
| |
|
|
| |
|
|
| |
28BYJ-48 Schrittmotor 5V DC + ULN2003A Treiberplatine |
|
| |
- STEP MOTOR 28BY J-48
- +5V DC
- 22038590
- ULN2003 module |
|
| |
Produktinformationen
"28BYJ-48 Schrittmotor 5V DC + ULN2003A Treiberplatine" Der Schrittmotor
mit Treiberplatine ULN2003A kann in verschiedenen Gerõten genutzt werden
unter anderen Drucker oder Werkzeugmaschinen. Technische Daten
Betriebspannung: 5V Widerstand: 300 Ohm Abmessungen Platine: 41 x 22 x
18 mm Abmessungen Schrittmotor: 31 x 42 x 29 mm 2 Befestigungsl÷cher am
Motor: 4mm Distanz Befestigungsl÷cher: 32mm 5 Pin Kabellõnge: 25 cm
Lieferumfang Schrittmotor Treiberplatine |
|
| |
-
5V-Schrittmotor 28BYJ-48 mit Treiberplatine ULN2003 f³r Arduino
ansteuern
|
|
| |
|
|
| |
|
|
| |
|
|
| |
|
|
| |
|
|
| |
|
|
| |
|
|
| |
-
Li-ion Battery
HAT - Waveshare Wiki |
|
| |
|
|
| |
|
|
| |
|
|
| |
|
|
| |
|
|
| |
|
|
| |
-
Espressif ESP32 | c't | Heise Magazine |
|
| |
-
ESP32 to go | heise Developer |
|
| |
|
|
| |
-
ESP8266-Nachfolger: ESP32 by Die Schatenseite |
|
| |
|
|
| |
|
|
| |
|
|
| |
|
|
| |
-
ArduiTouch Wandgehõuseset mit Touchscreen f³r ESP32 und ESP8266 -
AZ-Delivery |
|
| |
-
ArduiTouch 1 - Funktionsweise und Verwendung des Touch-Screen ¢
AZ-Delivery |
|
| |
|
|
| |
-
Zihatec - Zubeh÷r f³r Raspberry
Pi, Arduino and ESP8266 - Zihatec GmbH |
|
| |
-
Webshop Zihatec
- Zihatec GmbH |
|
| |
-
Touchscreen enclosure set for Arduino MKR - Zihatec GmbH |
|
| |
-
Wandgehõuse mit Touch f³r ESP32 & ESP8266 - Zihatec GmbH |
|
| |
|
|
| |
-
Smarthome-Zentrale
auf Basis AZ-Touch ESP von Gerhard Lechner |
|
| |
|
|
| |
|
|
| |
Touchscreen 2.4 inch
Touchscreen mit ILI9341 Controller, Ansteuerung via SPI. Touchcontroller
Typ XPT2046. |
|
| |
|
|
| |
- Mikrocontroller
ESP32, WiFi, 2* DAC |
|
| |
-
Internet-Radio mit dem ESP32 ¢ AZ-Delivery by Gerald Lechner
|
|
| |
|
|
| |
|
|
| |
|
|
